How to host BlueMap on Cloudflare R2
- For whom is this guide?
- What is Cloudflare R2?
- What do you need for this?
- Adding a domain to Cloudflare
- Creating a bucket & uploading files with rclone
- Uploading files with rclone
- Making necessary configurations
- Making optional configurations
For whom is this guide?
This guide is for people who want a static map, which they rarely if ever want to update. It is not intended for a live map of a server.
What is Cloudflare R2?
Cloudflare R2 is a service that allows you to host files on Cloudflare’s network. With a couple of tweaks, you can host static websites such as BlueMap on Cloudflare R2. Please bear in mind that Cloudflare R2 costs money.
What do you need for this?
- A Cloudflare account
- A Domain you own & is connected with Cloudflare
- A Credit card/prepaid card you have
- A rendered BlueMap, which uses FILE storage, not SQL storage
rcloneinstalled on the system you’ve rendered the map on
Adding a domain to Cloudflare
(You can skip this part and go to Setting Zero Trust Dashboard part)
Go to Websites, click on “Add a site” then write your domain name.
- “Select your plan”
- You can choose Free plan at the bottom.
- “Review DNS records”
- You can skip it because we don’t need to set a DNS for this method.
- “Change your nameservers”
- Go to the site where you bought your domain and change nameservers to Cloudflare’s nameservers.
Creating a bucket & uploading files with rclone
-
Go to R2, click on “Create bucket” then write your bucket name, e.g.
bluemap. -
In your new bucket, go to settings.
-
Scroll to Public Access / Custom Domains and click on “Connect Domain”. Enter the domain you want to use for BlueMap and confirm the changes.
-
(Optional) Scroll down and edit the “Default Multipart Abort Rule” by clicking on the three dots and then “Edit”. Set the “Multipart Abort Rule” to 1 day. This will cause multipart uploads to be aborted after 1 day if they are not completed. This is useful if a larger file upload is interrupted. It will remove the incomplete file after 1 day.
-
Go back to the R2 overview page and click on “Manage R2 API Tokens”. Click on “Create API Token” and give it a name. Give it “Admin Read & Write” permissions & create the token. Keep this page open for the
rcloneconfiguration.
Uploading files with rclone
-
Open a terminal and run
rclone configto configure rclone.
1. Choose “n” for new remote.
2. Choose a name for the remote, e.g.R2.
3. ChooseAmazon S3 Compliant Storage Providersas the storage provider. (As of the time of writing, option4.)
4. ChooseCloudflare R2 Storageas the provider. (As of the time of writing, option6.)
5. ChooseEnter AWS credentials in the next step.
6. Copy theAccess Key IDandSecret Access Keyfrom the R2 API Token page to the terminal.
7. Choose the only possible region.
8. Copy the endpoint from the R2 API token page to the terminal.
9. Do not edit the advanced config.
10. Check if the configuration is correct & confirm. -
Navigate in the terminal to the directory where your BlueMap web files are located. You should be in the directory that contains the file
index.html. - Run the following command to upload the files to your R2 bucket:
rclone sync . R2:bluemap/ --transfers=60 --checkers=120 -Prclone— the program you are calling.sync— the command to synchronize files — files which are not present in the destination will be copied there and files which are not present in the source will be deleted in the destination..— the current directory.R2:bluemap/— the remote you configured in the rclone configuration plus the name of your bucket.--transfers=60— the number of parallel transfers — BlueMap consists of numerous small files, so a high number of transfers is beneficial.--checkers=120— the number of parallel checks — BlueMap consists of numerous small files, so a high number of checks is beneficial. Checkers compare your local files to those remote.-P— shows you the progress.
- While the files are uploading, you can continue with the next step.
Making necessary configurations
-
Go to your domain inside the Cloudflare dashboard. Click on “Rules” and then “Transform Rules” — make sure you are in the Rewrite URL tab. Click on “Create Rule”.
-
Give the Rule a name, e.g.
BlueMap: Index. This rule will allow you to open the BlueMap domain without the need to enterindex.htmlat the end of the URL.
1. SelectCustom filter expression
1. In the first field, selectHostname. In the Operator field, selectequals. In the value field, enter the domain you are using for BlueMap, e.g.map.example.com.
2. Click onAndto add another rule.
3. In the first field selectURI Pathand in the Operator field selectends with. In the value field, enter/.
2. Further down under Path, selectRewrite to....
1. In the first field selectDynamicand in the second field enterconcat(http.request.uri.path, "index.html").
3. It should look similar to this: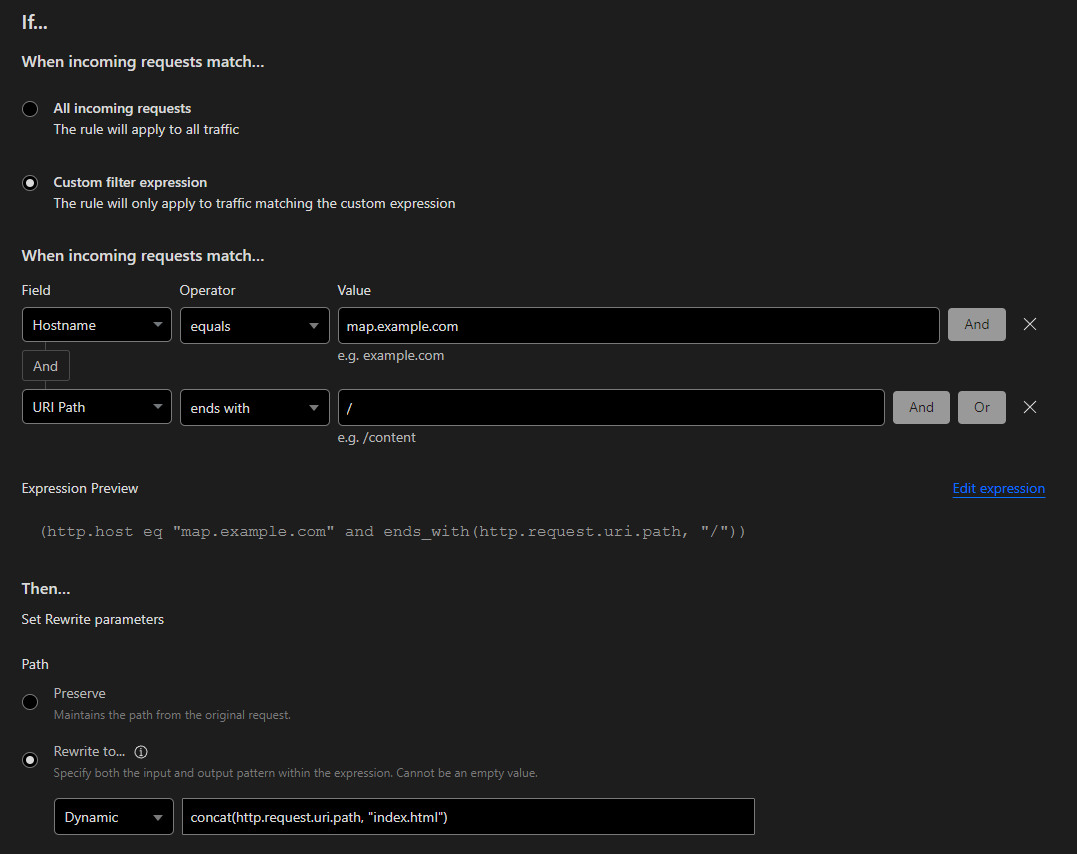
4. Save the rule. -
Create another Transform rule here and give it a name, e.g.
BlueMap: gzip. This rule allows Cloudflare to serve the compressed files when the textures or the .prbm files are requested.
1. SelectCustom filter expression
1. In the first field, selectHostname. In the Operator field, selectequals. In the value field, enter the domain you are using for BlueMap, e.g.map.example.com.
2. Click onAndto add another rule.
3. In the first field selectURI Pathand in the Operator field selectends with. In the value field, entertextures.json.
4. Click onOrto add another rule.
5. In the first field, selectHostname. In the Operator field, selectequals. In the value field, enter the domain you are using for BlueMap, e.g.map.example.com.
6. Click onAndto add another rule.
7. In the first field selectURI Pathand in the Operator field selectends with. In the value field, enter.prbm.
2. Further down under Path, selectRewrite to....
1. In the first field selectDynamicand in the second field enterconcat(http.request.uri.path, ".gz"). 3. It should look similar to this: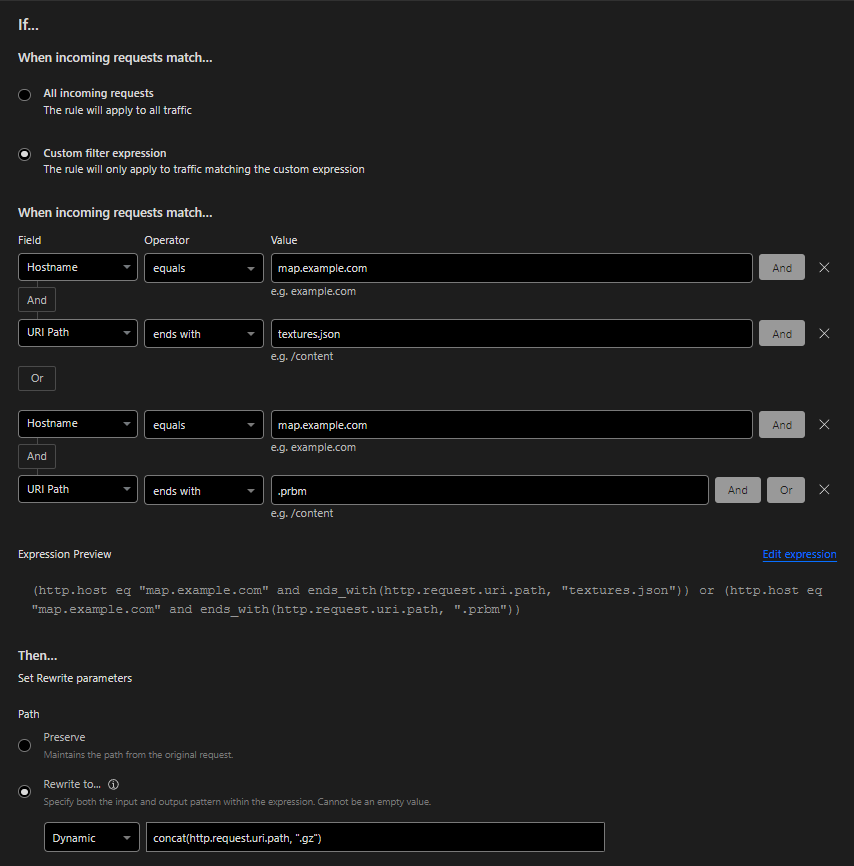
4. Save the rule. -
Now click on the
Modify Response Headertab and create a new rule. This rule marks the compressed files as compressed, so your browser knows how to handle them when it requests them.
1. Give the rule a name, e.g.BlueMap: Content-Encoding.
2. SelectCustom filter expression
1. In the first field, selectURI Path. In the Operator field, selectends with. In the value field, enter.gz.
2. Click onOrto add another rule.
3. In the first field, selectURI Path. In the Operator field, selectends with. In the value field, entertextures.json.
4. Click onOrto add another rule.
5. In the first field, selectURI Path. In the Operator field, selectends with. In the value field, enter.prbm.
3. Further down underModify response header.
1. In the first field, selectSet static. In the Header name field, enterContent-Encoding. In the Header value field, entergzip.
4. It should look similar to this: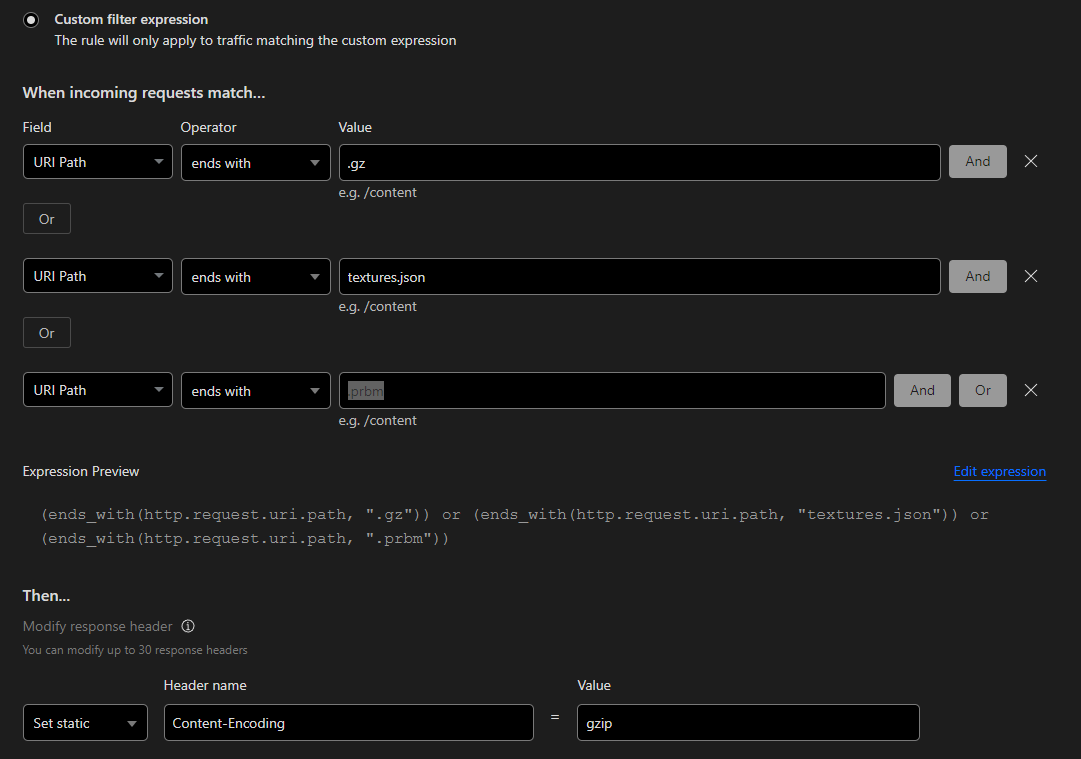
5. Save the rule.
Making optional configurations
Every time a file is requested from your bucket, that counts as an operation. Every operation above the free limit induces a cost. To reduce the number of requests to your bucket, you can set up a cache policy. This has 2 parts. The first part of the rule (the Edge TTL) will cache the files on Cloudflare’s edge servers and serve them from there. This will reduce the number of requests to your bucket and thus reduce the costs. The second part of the rule (the Browser TTL) will increase the time the files are cached in the browser. This can be beneficial if you have many visitors who visit the map multiple times. They can load the map faster because the files are already in their browser cache. If they want to see the latest version of the map, they can do a hard refresh (Ctrl + F5) to force the browser to load the static files from the server AND click on the “Update Map” button in the menu to reload the map tiles.
-
Go to your domain inside the Cloudflare dashboard. Click on “Rules” and then “Cache Rules”. Click on “Create Rule”.
1. Give the Rule a name, e.g.BlueMap: Cache.
2. SelectCustom filter expression
1. In the first field, selectHostname. In the Operator field, selectequals. In the value field, enter the domain you are using for BlueMap, e.g.map.example.com.
3. Further down underCache eligibilityselectEligible for cache.
4. Further down underEdge TTLclick onAdd Setting.
1. Now selectIgnore cache-control header and use this TTLand setInput time-to-live (TTL)to a value you are comfortable with. I set it to 1 year, this will cache the files on Cloudflare’s edge servers for up to 1 year.
5. Further down underBrowser TTLclick onAdd Setting.
1. Now selectOverride origin and use this TTLand setInput time-to-live (TTL)to a value you are comfortable with. I set it to 1 year, this will cache the files in the browser for up to 1 year.
6. It should look similar to this: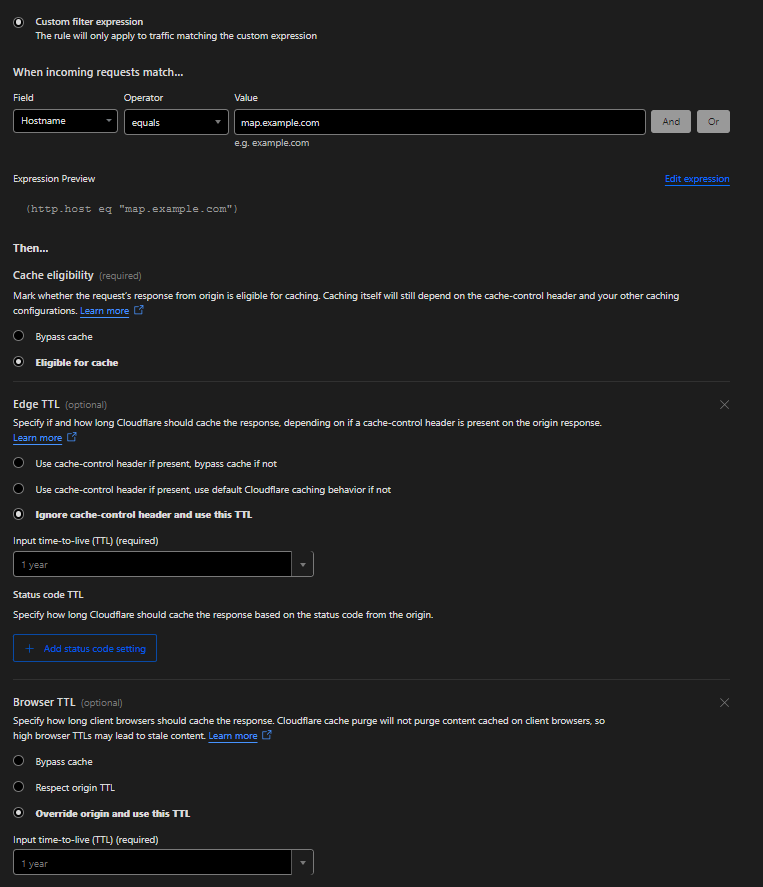
7. Save the rule. -
If you have a paid plan, you can potentially use “Custom error responses” to change 404 errors to 204 errors as suggested by the External Web server documentation. This is however, not necessary for BlueMap to work. Since this documentation is about Cloudflare R2 and the free domain plan, I will not go into detail about this.